
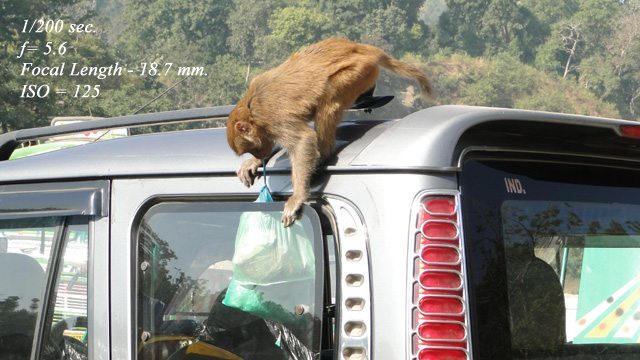
There is no time to think and plan when such incidents take place. Auto exposure cameras work best in such cases.

The way to freeze an action is ‘choosing fast shutter’.
इससे पहले कि मैं किसà¥à¤¸à¤¾-à¤-फोटोगà¥à¤°à¤¾à¤«à¥€ शà¥à¤°à¥ करूं, अगर अनà¥à¤®à¤¤à¤¿-à¤-आपकी हो तो पहले à¤à¤• किसà¥à¤¸à¤¾ सà¥à¤¨à¤¾à¤¨à¤¾ चाहूंगा। सà¥à¤¨à¤¾ है कि à¤à¤• छातà¥à¤° फोटोगà¥à¤°à¤¾à¤«à¥€ सीखने के लिये मà¥à¤‚बई के à¤à¤• पà¥à¤°à¤–à¥à¤¯à¤¾à¤¤ फोटोगà¥à¤°à¤¾à¤«à¤° के पास पहà¥à¤‚चा। पांच दिन तक कैमरे के सà¤à¥€ अंग-पà¥à¤°à¤¤à¥à¤¯à¤‚गों का परिचय देने के बाद, गà¥à¤°à¥ ने अपने शिषà¥à¤¯ से कहा कि अपने कैमरे में à¤à¤• फिलà¥à¤® डालो और निकल पड़ो मà¥à¤‚बई की फोटोगà¥à¤°à¤¾à¤«à¥€ के लिये !  जो कà¥à¤› à¤à¥€ अचà¥à¤›à¤¾ लगे, उसकी फोटो खींच लाओ !
रात को थका-हारा शिषà¥à¤¯ वापिस आया! फिलà¥à¤® धà¥à¤²à¤µà¤¾à¤ˆ गई और पà¥à¤°à¤¿à¤‚ट बनवा कर मेज पर फैला दिये गये। गà¥à¤°à¥à¤œà¥€ ने शिषà¥à¤¯ से पूछा, “बताओ, किस सà¥à¤¥à¤¾à¤¨ की फोटो सबसे अचà¥à¤›à¥€ लगीं?†शिषà¥à¤¯ ने जवाब दिया, मà¥à¤à¥‡ तो गेट वे ऑफ इंडिया की फोटो सबसे अचà¥à¤›à¥€ लग रही है। गà¥à¤°à¥à¤œà¥€ ने अगले दिन उस शिषà¥à¤¯ को सारी की सारी फोटो गेटवे ऑफ इंडिया की खींचने का आदेश दे दिया।  शिषà¥à¤¯ ने विà¤à¤¿à¤¨à¥à¤¨ कोणों से सारे के सारे चितà¥à¤° गेटवे ऑफ ईंडिया के ही खींच डाले। शाम को फिलà¥à¤® धà¥à¤²à¥€, पà¥à¤°à¤¿à¤‚ट बने और फिर गà¥à¤°à¥à¤œà¥€ ने पूछा, “कौन का फोटो सबसे अचà¥à¤›à¤¾ लगा?†तो शिषà¥à¤¯ ने बता दिया ।
गà¥à¤°à¥à¤œà¥€ ने पà¥à¤¨à¤ƒ à¤à¤• फिलà¥à¤® लोड कराई और कहा कि कल जाकर गेटवे ऑफ इंडिया के सारे के सारे फोटो इसी à¤à¤‚गिल के खींच कर लाओ! बेचारा शिषà¥à¤¯ पà¥à¤¨à¤ƒ गया और सà¥à¤¬à¤¹ से शाम तक उसी à¤à¤‚गिल से à¤à¤¿à¤¨à¥à¤¨-à¤à¤¿à¤¨à¥à¤¨ पà¥à¤°à¤•à¤¾à¤¶ में फोटो खींचता रहा। शाम को पà¥à¤¨à¤ƒ पà¥à¤°à¤¿à¤‚ट फैलाये गये और गà¥à¤°à¥à¤œà¥€ ने जब शिषà¥à¤¯ से पूछा, “कौन सा फोटो पसनà¥à¤¦ आया है?†तो शिषà¥à¤¯ ने बता दिया कि मà¥à¤à¥‡ तो सूरà¥à¤¯à¤¾à¤¸à¥à¤¤ के समय का यह चितà¥à¤° सबसे अधिक à¤à¤¾ रहा है! गà¥à¤°à¥à¤œà¥€ ने उसे कहा, “जाओ, तà¥à¤®à¥à¤¹à¤¾à¤°à¥€ शिकà¥à¤·à¤¾ पूरà¥à¤£ हà¥à¤ˆ!â€Â तà¥à¤®à¥à¤¹à¥‡à¤‚ photographic subject, various angles और various types of lighting का जà¥à¤žà¤¾à¤¨ हो गया है। फोटोगà¥à¤°à¤¾à¤«à¥€ यहीं से शà¥à¤°à¥ होती है, अब जीवन à¤à¤° फोटोगà¥à¤°à¤¾à¤«à¥€ करते रहो और सीखते रहो!
यदि इस कहानी की इशà¥à¤Ÿà¤¾à¤‡à¤² में मैं à¤à¥€ अपनी तà¥à¤šà¥à¤› बà¥à¤¦à¥à¤§à¤¿ से कà¥à¤› बताने का पà¥à¤°à¤¯à¤¾à¤¸ करूं तो सबसे पहले मà¥à¤à¥‡ कैमरे के मूलà¤à¥‚त अंगों की जानकारी देनी चाहिये। फोटोगà¥à¤°à¤¾à¤«à¥€ 50% विजà¥à¤žà¤¾à¤¨ है और 50 पà¥à¤°à¤¤à¤¿à¤¶à¤¤ ललित कला !   ललित कला की ओर बॠसकें, इसके लिये थोड़ा – बहà¥à¤¤ विजà¥à¤žà¤¾à¤¨ जानना आवशà¥à¤¯à¤• हो जाता है, à¤à¤²à¥‡ ही हम चाहें या न चाहें !  चलिये, पà¥à¤°à¤¯à¤¾à¤¸ करता हूं कि बिना आपको अधिक बोर किये कà¥à¤› जानकारी दे सकूं ! सà¤à¥€ महतà¥à¤µà¤ªà¥‚रà¥à¤£ जानकारी दà¥à¤µà¤¿à¤à¤¾à¤·à¤¿à¤• रूप में दे रहा हूं ताकि हर किसी को सà¥à¤à¥€à¤¤à¤¾ रहे !
इतना तो हम सà¤à¥€ जानते ही हैं कि हमारा कैमरा ’अचà¥à¤›à¥€ फोटो’ ले सके, इसके लिये उसे à¤à¤• निशà¥à¤šà¤¿à¤¤ मातà¥à¤°à¤¾ में पà¥à¤°à¤•à¤¾à¤¶ की आवशà¥à¤¯à¤•à¤¤à¤¾ होती है। अचà¥à¤›à¥€ फोटो वह मानी जायेगी, जिसे देख कर हमें संतà¥à¤·à¥à¤Ÿà¤¿ हो और मन को यह लगे कि फोटो खींचने का उदà¥à¤¦à¥‡à¤¶à¥à¤¯ पूरा हो गया!
In order to capture an image successfully, a certain amount of light is required by the camera. A picture, if serves its purpose well, is good.
कैमरे में पहà¥à¤‚च रहे पà¥à¤°à¤•à¤¾à¤¶ को नियंतà¥à¤°à¤¿à¤¤ करने के लिये हमारे पास चार उपाय हैं। इनमें से किसी à¤à¥€ à¤à¤• या à¤à¤•à¤¾à¤§à¤¿à¤• उपाय का उपयोग करके हम फिलà¥à¤® / कैमरे के सैंसर तक पहà¥à¤‚चने वाले पà¥à¤°à¤•à¤¾à¤¶ की मातà¥à¤°à¤¾ यानि exposure को नियंतà¥à¤°à¤¿à¤¤ कर सकते हैं परनà¥à¤¤à¥ ये सà¤à¥€ उपाय अपने अपने ढंग से हमारी फोटो को à¤à¥€ पà¥à¤°à¤à¤¾à¤µà¤¿à¤¤ करते हैं।
There are four methods available to us for controlling the amount of light reaching the film / sensor of the camera. However, while we can get exactly same exposure by employing any of these four methods, the photo that we would get by playing with these controls would be different in each case.
|
Intensity of light |
Shutter Speed |
Aperture |
ASA / ISO |
|
100 watt. |
1/1000 sec. |
1.4 |
25 |
|
200 watt. |
1/500 sec. |
2 |
50 |
|
400 watt. |
1/250 sec. |
2.8 |
100 |
|
800 watt. |
1/125 sec. |
4 |
200 |
|
1600 watt. |
1/60 sec. |
5.6 |
400 |
|
3200 watt. |
1/30 sec. |
8 |
800 |
|
6400 watt. |
1/15 sec. |
11 |
1600 |
|
12800 watt. |
1/8 sec. |
16 |
3200 |
|
25600 watt. |
¼ sec. |
22 |
6400 |
|
51200 watt. |
½ sec. |
32 |
12800 |
जैसा कि ऊपर दी गई तालिका में दिखाया गया है, हम उपरोकà¥à¤¤ चार माधà¥à¤¯à¤®à¥‹à¤‚ में से किसी à¤à¥€ à¤à¤• या à¤à¤•à¤¾à¤§à¤¿à¤• उपाय का उपयोग करके पà¥à¤°à¤•à¤¾à¤¶ की मातà¥à¤°à¤¾ कम या अधिक कर सकते हैं। हम चाहें तो पà¥à¤°à¤•à¤¾à¤¶ की तीवà¥à¤°à¤¤à¤¾ कम जà¥à¤¯à¤¾à¤¦à¤¾ कर लें, चाहें तो कैमरे में दी गई शटर सà¥à¤ªà¥€à¤¡ कम जà¥à¤¯à¤¾à¤¦à¤¾ कर लें। कैमरे की लेंस पर दिये गये à¤à¤ªà¤°à¤šà¤° को à¤à¥€ कम या अधिक किया जा सकता है।  अंतिम उपाय के रूप में फिलà¥à¤® या सैंसर की पà¥à¤°à¤•à¤¾à¤¶ गà¥à¤°à¤¾à¤¹à¥à¤¯à¤¤à¤¾ (senstivity) को à¤à¥€ कम या अधिक किया जा सकता है।  बीच के दो कॉलम को धà¥à¤¯à¤¾à¤¨ से देखिये और à¤à¤• à¤à¤¸à¥€ सà¥à¤¥à¤¿à¤¤à¤¿ की कलà¥à¤ªà¤¨à¤¾ कीजिये कि जिसमें 1/125 sec. शटर सà¥à¤ªà¥€à¤¡ और 4 à¤à¤ªà¤°à¥à¤šà¤° पर हमें correctly exposed फोटो पà¥à¤°à¤¾à¤ªà¥à¤¤ हो रही है।
अब à¤à¤¸à¥€ सà¥à¤¥à¤¿à¤¤à¤¿ में हम 4 à¤à¤ªà¤°à¥à¤šà¤° के बजाय 11 à¤à¤ªà¤°à¥à¤šà¤° चाहते हैं तो हमें शटर सà¥à¤ªà¥€à¤¡ à¤à¥€ 1/125 के सà¥à¤¥à¤¾à¤¨ पर 1/15 करनी पड़ेगी !  चूंकि 1/15 पर कैमरा या फोटो खिंचवा रहे वà¥à¤¯à¤•à¥à¤¤à¤¿ के हिल जाने का बहà¥à¤¤ अधिक खतरा है à¤à¤¸à¥‡ में या तो हमें पà¥à¤°à¤•à¤¾à¤¶ की मातà¥à¤°à¤¾ 800 वाट से बà¥à¤¾ कर 6400 वाट करनी पड़ेगी या फिर अपने डिजिटल कैमरे की ISO setting में परिवरà¥à¤¤à¤¨ करके उसे 1600 ISO पर लाना होगा !  जिन दिनों फिलà¥à¤® वाले कैमरे पà¥à¤°à¤šà¤²à¤¿à¤¤ थे, फिलà¥à¤® खरीदते समय हमें देखना होता था कि हमें कितनी senstivity वाली फिलà¥à¤® चाहिये। हमारे देश में अधिकांशतः 100 ASA / ISO से लेकर 400 ASA / ISO वाली फिलà¥à¤®à¥‡à¤‚ बेची जाती रही हैं। 100 ASA/ISO से कम और 400 ASA/ISO से अधिक गति वाली फिलà¥à¤®à¥‡à¤‚ आम गà¥à¤°à¤¾à¤¹à¤• तो नहीं हां, विशेषजà¥à¤ž फोटोगà¥à¤°à¤¾à¤«à¤° खरीदते रहे हैं इसलिये हर शहर में ये फिलà¥à¤®à¥‡à¤‚ मिलती à¤à¥€ नहीं थीं। मà¥à¤à¥‡ à¤à¤¸à¥€ फिलà¥à¤®à¥‡à¤‚ खरीदने के लिये अकà¥à¤¸à¤° चांदनी चौक, दिलà¥à¤²à¥€ में मदन जी की या à¤à¤¸à¥€ ही किसी और दà¥à¤•à¤¾à¤¨ पर जाना पड़ता था।
As shown in above table, we can employ any one or more methods to control the required exposure. If we can increase/decrease the intensity of light, we also have the options of controlling the shutter duration / aperture opening or the senstivity of the film / sensor. Please look at the two middle columns of above table and think of a situation where you are getting correctly exposed picture at 1/125 sec. and f=4 aperture.  Now, if you want an aperture of 11 instead of 4, there are three ways to do it. 1) Change the shutter speed from 1/125 to 1/15. But this would increase the risk of camera / subject movement. 2) Increase the intensity of light so that it is 6400 watt instead of 800 watt. 3) The third and last method would be to increase the ISO speed from 200 to 1600 ISO.
In the days when film cameras were highly popular, we had to decide ISO speed of the film at the time of buying a film. If most of the shooting was to be done in low light, we wanted faster film and vice versa. In Indian market, films slower than 100 ASA or faster than 400 ASA were used by specialist photographers only and were generally not available in the market. I can’t help remembering the days when I used to shop for such special purpose films from Madan Ji at Chandni Chowk, Delhi or similar other showrooms nearby.
उकà¥à¤¤ तालिका में पà¥à¤°à¤•à¤¾à¤¶ की मातà¥à¤°à¤¾ / शटर सà¥à¤ªà¥€à¤¡ और फिलà¥à¤® की पà¥à¤°à¤•à¤¾à¤¶ गà¥à¤°à¤¾à¤¹à¥à¤¯à¤¤à¤¾ (Intensity of light / Shutter speed / Senstivity of Film or sensor ) को तो देख कर हर कोई समठसकता है कि जैसे – जैसे हम नीचे की पंकà¥à¤¤à¤¿ में आते हैं, पà¥à¤°à¤•à¤¾à¤¶ दà¥à¤—ना हो रहा है, शटर का समय à¤à¥€ दà¥à¤—ना हो रहा है और फिलà¥à¤® / सैंसर की सà¥à¤ªà¥€à¤¡ à¤à¥€ दà¥à¤—नी होती जा रही है। पर आप संà¤à¤µà¤¤à¤ƒ aperture values को देख कर उनका आपसी संबंध न समठपा रहे हों ! पर इन aperture values का आपसी संबंध à¤à¥€ वही है, जो बाकी तीन का है – अरà¥à¤¥à¤¾à¤¤à¥â€Œ आधा और दà¥à¤—ना का संबंध है। जैसे ही आप 1/1000 सैकेंड को बदल कर 1/500 सैकेंड करते हैं, आप exposure दà¥à¤—ना कर देते हैं।
ठीक उसी पà¥à¤°à¤•à¤¾à¤° जैसे ही आप 32 à¤à¤ªà¤°à¤šà¤° को बदल कर 22 करते हैं, या 5.6 के सà¥à¤¥à¤¾à¤¨ पर 4 करते हैं तो आप exposure दà¥à¤—ना कर रहे हैं।  वासà¥à¤¤à¤µ में Aperture मापने के लिये लैंस की फोकल लैंगà¥à¤¥ में diameter of the effective opening से à¤à¤¾à¤— दिया जाता है। उदाहरणारà¥à¤¥, यदि लैंस की focal length 100 mm. हो और à¤à¤ªà¤°à¤šà¤° का dia. à¤à¥€ 50 mm. हो तो aperture value 2 हो जायेगी ! अगर aperture value 2 हो तो उसका अरà¥à¤¥ यह à¤à¥€ है कि इस aperture value पर लैंस उपलबà¥à¤§ पà¥à¤°à¤•à¤¾à¤¶ की आधी मातà¥à¤°à¤¾ ही फिलà¥à¤® / सैंसर तक पहà¥à¤‚चा रही है।

I had to practically run after this little devil to keep her well in frame.

Waiting for the passengers!
It should be evident to everyone that exposure is doubled / halved as we move up / down from one row to the other in any of the four columns. If you are a bit confused while looking at the aperture values, please rest assured that these values also have the relationship of half / double exposure as soon as we go down or up from one row to another.
In fact, we arrive at these figures by dividing focal length of the lens with the effective diameter of the lens. If our lens has got 100 mm. focal length and the dia. Of the lens aperture is 50 mm., we get aperture value of 2 which also means that at 2 aperture, the lens is allowing only half the amount of available light.

M=Manual, A=Aperture priority, S=Shutter Priority & P=Programmed auto.
आटोमैटिक à¤à¤•à¥à¤¸à¤ªà¥‹à¥›à¤° वाले कैमरे और मैनà¥à¤…ल à¤à¤•à¥à¤¸à¤ªà¥‹à¥›à¤° वाले कैमरे में अनà¥à¤¤à¤° सिरà¥à¤« इतना है कि ऑटोमैटिक à¤à¤•à¥à¤¸à¤ªà¥‹à¥›à¤° वाले कैमरे में इलेकà¥à¤Ÿà¥à¤°à¥‰à¤¨à¤¿à¤• à¤à¤•à¥à¤¸à¤ªà¥‹à¥›à¤° मीटर फिट कर दिया गया है जो उपलबà¥à¤§ पà¥à¤°à¤•à¤¾à¤¶ की मातà¥à¤°à¤¾ को अनà¥à¤à¤µ कर के शटर व à¤à¤ªà¤°à¤šà¤° की à¤à¤¸à¥€ सैटिंग तय कर देता है, जिससे फिलà¥à¤® अथवा सैंसर तक सही मातà¥à¤°à¤¾ में पà¥à¤°à¤•à¤¾à¤¶ पहà¥à¤‚च सके ।
यदि उपलबà¥à¤§ पà¥à¤°à¤•à¤¾à¤¶ इतना कम है कि शटर का समय अधिकतम बà¥à¤¾ कर या à¤à¤ªà¤°à¤šà¤° पूरा खोल कर à¤à¥€ काम नहीं चल पा रहा है तो कैमरा फà¥à¤²à¥ˆà¤¶ लाइट खà¥à¤¦ ब खà¥à¤¦ ऑन कर देता है (auto-flash feature) । दूसरी ओर, मैनà¥à¤…ल à¤à¤•à¥à¤¸à¤ªà¥‹à¥›à¤° वाले कैमरे में à¤à¥€ आजकल मीटर होता तो है परनà¥à¤¤à¥ वह सिरà¥à¤« यह बताता है कि वरà¥à¤¤à¤®à¤¾à¤¨ सैटिंग पर पà¥à¤°à¤•à¤¾à¤¶ कम है, जà¥à¤¯à¤¾à¤¦à¤¾ है या सही है। यदि कैमरे की बà¥à¤¦à¥à¤§à¤¿ के अनà¥à¤¸à¤¾à¤° पà¥à¤°à¤•à¤¾à¤¶ आदरà¥à¤¶ सà¥à¤¥à¤¿à¤¤à¤¿ से कम या अधिक है तो उसे ठीक करने की जिमà¥à¤®à¥‡à¤¦à¤¾à¤°à¥€ कैमरे की नहीं, बलà¥à¤•à¤¿ आपकी ही है। यदि आप कà¥à¤› खास इफेकà¥à¤Ÿ चाहते हैं तो आप कैमरे के निरà¥à¤£à¤¯ को नकारते हà¥à¤ जानबूठकर underexposure या overexposure फोटो खींच सकते हैं।
आज कल अधिकांश कैमरे à¤à¤¸à¥‡ उपलबà¥à¤§ हैं जिनमें मैनà¥à¤…ल à¤à¤•à¥à¤¸à¤ªà¥‹à¥›à¤° और आटोमैटिक à¤à¤•à¥à¤¸à¤ªà¥‹à¥›à¤° – दोनों ही मोड उपलबà¥à¤§ हैं। यही नहीं, आटोमैटिक à¤à¤•à¥à¤¸à¤ªà¥‹à¥›à¤° मोड में à¤à¥€ अनेकानेक विकलà¥à¤ª उपलबà¥à¤§ हैं जैसे shutter priority, aperture priority, shift program mode, portrait mode, landscape mode आदि ! यदि आपका कैमरा आटो मोड के साथ-साथ मैनà¥à¤…ल मोड à¤à¥€ उपलबà¥à¤§ कराता है ताकि आप चाहें तो à¤à¤ªà¤°à¤šà¤° और शटर सà¥à¤ªà¥€à¤¡ खà¥à¤¦ तय कर सकें तो आपका कैमरा निशà¥à¤šà¤¯ ही अचà¥à¤›à¥‡ कैमरों की शà¥à¤°à¥‡à¤£à¥€ में आता है।

Practising steady hand helps a lot in low light photography of stage performances
There are two kinds of cameras available – automatic and manual exposure type. An automatic exposure camera may set the shutter speed or the aperture or both automatically with the help of an electronic exposure meter built into the camera.  If the light is not enough, the camera may even switch on the flash fitted into the camera. The Manual Exposure Camera, on the other hand, merely suggests that the presently selected settings will give ‘correct exposure’ or not and if not, whether the picture would be under-exposed or over-exposed. However, it can’t proceed to change the aperture / shutter speed values on its own. It is for you to decide what settings would prevail. Sometimes, the photographers deliberately ignore the settings being suggested by the camera in order to achieve some special effect through over/under exposure.
Modern cameras offer both the modes – AUTO as well as MANUAL. Not only this, AUTO MODE offers a large number of options – Aperture Priority, Shutter Priority, Shift Program, Full Auto etc. In AUTO mode, several scenes are also being offered – Landscape, Portrait, Sports etc. If you have a camera that offers full MANUAL mode enabling you to set aperture and/or shutter speed manually, besides offering AUTO MODE, you are definitely blessed with a good camera.
 शटर का कलातà¥à¤®à¤• उपयोग :

Even the splashing water is frozen with the help of high shutter speed.
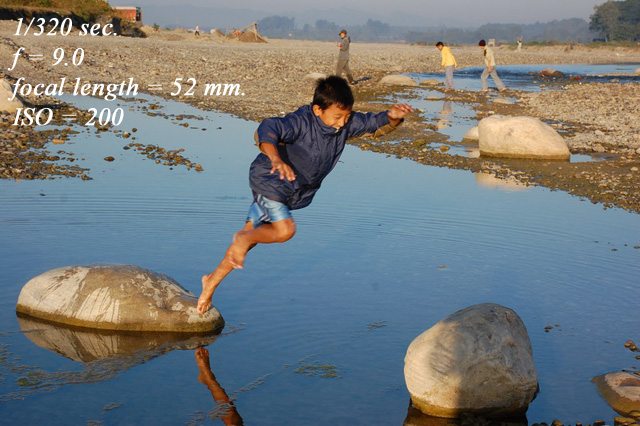
à¤à¤ªà¤°à¤šà¤° और शटर की सैटिंग बदलने से सिरà¥à¤« पà¥à¤°à¤•à¤¾à¤¶ की मातà¥à¤°à¤¾ यानि à¤à¤•à¥à¤¸à¤ªà¥‹à¥›à¤° पर ही फरà¥à¤• पड़ता हो, à¤à¤¸à¤¾ नहीं है। उदाहरण के लिये, शटर खोले जाने की अवधि कम करके (यानि fast shutter speed e.g. 1/1000 sec. या इससे à¤à¥€ कम समय) हम चलती फिरती वसà¥à¤¤à¥à¤“ं को à¤à¥€ रà¥à¤•à¤¾ हà¥à¤† दिखा सकते हैं। आम तौर पर पैदल चल रहे वà¥à¤¯à¤•à¥à¤¤à¤¿à¤¯à¥‹à¤‚ को रà¥à¤•à¤¾ हà¥à¤† दिखाने के लिये 1/500 सैकेंड का समय परà¥à¤¯à¤¾à¤ªà¥à¤¤ है, वहीं दूसरी ओर तेजी से à¤à¤¾à¤—ी चली जा रही कार को रà¥à¤•à¤¾ हà¥à¤† दिखाने के लिये 1/4000 सैकेंड का समय परà¥à¤¯à¤¾à¤ªà¥à¤¤ हो सकता है। फोटो खींचने का समय केवल 1/50,000 सैकेंड किया जा सके तो संà¤à¤µà¤¤à¤ƒ बंदूक से निकली हà¥à¤ˆ गोली à¤à¥€ हवा में रà¥à¤•à¥€ हà¥à¤ˆ नज़र आयेगी!
Pictorial effects of Shutter :
Timing of pressing the shutter is important.

Fast shutter virtually stops the movement of blades.

Blades are moving at same speed but the shutter speed is slower here.
It is not that shutter and aperture can only be used for controlling the amount of light reaching the film / sensor. For example, we can play with different shutter speeds for creative purposes as well. By opening shutter for extremely short duration, we can freeze movement of virtually any subject. A sports person taking a high jump may look as if hanging mid-air just above the pole by taking his photograph at 1/1000 second or even faster shutter speed. A lot of scientific experiments to understand kinetics have been possible by freezing movement of a bullet passing through a water-filled baloon by giving an extremely short exposures of 1/50,000 second duration. As of this day, no camera allows shutter speed faster than 1/12,000 second but flash can fire for much shorter duration.
इसके सरà¥à¤µà¤¥à¤¾ विपरीत, यदि हम शटर खà¥à¤²à¥‡ रहने का समय बà¥à¤¾ कर कà¥à¤› सैकेंड या मिनट कर दें तो सरà¥à¤µà¤¥à¤¾ अकलà¥à¤ªà¤¨à¥€à¤¯ चितà¥à¤° पà¥à¤°à¤¾à¤ªà¥à¤¤ कर सकते हैं। यदि à¤à¤• à¤à¤¸à¥€ सड़क पर जिस पर 100 km. की गति से कारें à¤à¤¾à¤—ी चली जा रही हों, हम कैमरा सà¥à¤Ÿà¥ˆà¤‚ड पर फिट करके 2 मिनट या और अधिक का à¤à¤•à¥à¤¸à¤ªà¥‹à¥›à¤° दे दें तो हमारे चितà¥à¤° में à¤à¤• à¤à¥€ कार नज़र नहीं आयेगी ! सिरà¥à¤« बिलà¥à¤¡à¤¿à¤‚ग ही नज़र आयेंगी, चलती फिरती वसà¥à¤¤à¥à¤à¤‚ सब गायब हो जायेंगी।  फोटो देख कर लोग समठबैठेंगे कि शायद फोटो खींचते समय कनाट पà¥à¤²à¥‡à¤¸ में करà¥à¤«à¥à¤¯à¥‚ लगा हà¥à¤† था! आपने à¤à¤°à¤¨à¥‹à¤‚ की à¤à¤¸à¥€ फोटो देखी हैं जिनमें पानी के सà¥à¤¥à¤¾à¤¨ पर दूध बहता हà¥à¤† पà¥à¤°à¤¤à¥€à¤¤ होता है?  ये फोटो long exposure का नतीज़ा होती हैं।
लंबी अवधि के लिये शटर खोल कर जो मनà¤à¤¾à¤µà¤¨ चितà¥à¤° लिये जाते हैं उनमें रातà¥à¤°à¤¿ कालीन चितà¥à¤°à¥‹à¤‚ की संखà¥à¤¯à¤¾ बहà¥à¤¤ अधिक है। दीपावली के अवसर पर à¤à¤µà¤¨à¥‹à¤‚ व आतिशबाजी के चितà¥à¤°, चनà¥à¤¦à¥à¤°à¤®à¤¾ के पà¥à¤°à¤•à¤¾à¤¶ में landscapes, रंग बिरंगे फवà¥à¤µà¤¾à¤°à¥‹à¤‚ के चितà¥à¤°, कृतà¥à¤°à¤¿à¤® पà¥à¤°à¤•à¤¾à¤¶ में à¤à¤µà¤¨à¥‹à¤‚ के और सड़क पर दौड़ रहे वाहनों के चितà¥à¤° आदि इसी पà¥à¤°à¤•à¤¾à¤° के चितà¥à¤° हैं जिनमें कैमरे को सà¥à¤Ÿà¥ˆà¤‚ड पर लगा कर शटर को कई सैकेंड अथवा मिनट के लिये खोल दिया जाता है।

Decorated buildings require long exposures

इतना अवशà¥à¤¯ है कि दिन में सूरà¥à¤¯ के पà¥à¤°à¤•à¤¾à¤¶ में इतना लंबा à¤à¤•à¥à¤¸à¤ªà¥‹à¥›à¤° देने के लिये हमें पà¥à¤°à¤•à¤¾à¤¶ को बहà¥à¤¤ कम करना पड़ेगा। à¤à¤¸à¤¾ हम à¤à¤ªà¤°à¤šà¤° को नà¥à¤¯à¥‚नतम करके ( जैसे 32) और ISO senstivity को à¤à¥€ नà¥à¤¯à¥‚नतम करके कर सकते हैं। इससे à¤à¥€ गà¥à¥›à¤¾à¤°à¤¾ न हो तो अपने कैमरे की लेंस पर ND filter (Neutral Density Filter) लगा सकते हैं। ND Filter लगाने का अरà¥à¤¥ है अपने कैमरे को काला चशà¥à¤®à¤¾ पहना देना। आई बात समठमां?
On the other extreme, we can use long exposures (more than 1 second and upto several minutes) to get interesting photographic results. Artificially lighted streets and buildings on special occasions like Diwali, light streaks caused by headlights and red coloured tail lamps of moving automobiles, moonlit scenes, colourful fountains are examples of this type of photography.
However, it is compulsory to provide good support (e.g. a tripod) to your camera to avoid camera movement during exposure. As DL pointed out recently in one of his comments, the rule of thumb is “not to use shutter slower than the focal length of your camera lens. If the camera lens is set at 50 mm. focal length, it is difficult to get sharp pictures if you are using shutter slower than 1/60 second.†In fact, blurred pictures are the result of any one or more of three reasons – i) improper focus ii) camera shake by using slow shutter speeds iii) movement of the subject during exposure.
If you want to get a sharp pictures of a moving train or of a pace bowler immediately before delivering his ball in a cricket match, you have to opt for exposure of a very short duration – say 1/2000 second or even less. But in case of buildings, you can open the shutter for several minutes if the camera is firmly supported by a tripod.
If we want long exposures in a sun-lit scene during day time, we have to opt for minimum possible aperture (22 or 32 if possible), lowest possible ISO senstivity (100 ISO or less) of the film / sensor and an ND filter (Neutral Density Filter) which is a dark coloured sun-glass for your camera lens. ND filters come in varying strengths – darker glasses allowing longer duration exposures. Got it?
लैंस à¤à¤ªà¤°à¥à¤šà¤° का कलातà¥à¤®à¤• उपयोग :

Wide angle lens at 18 mm. offers excellent depth of field. After all, when so many sweets are on display, everything should come out sharp.

Selective focusing. Only the point of critical focus is sharp,

Selecting large apertures helps in getting rid of distracting background.

Throwing background out of focus draws attention to our main subject of interest. Here the vegetation behind these flowers has become a coloured background only.
जब हम अपने कैमरे को किसी वसà¥à¤¤à¥ या वà¥à¤¯à¤•à¥à¤¤à¤¿ पर फोकस करते हैं तो हर वह वसà¥à¤¤à¥ या वà¥à¤¯à¤•à¥à¤¤à¤¿ सà¥à¤µà¤¯à¤®à¥‡à¤µ फोकस में आ जाता है जो उतनी ही दूरी पर मौजूद है।  मान लीजिये, यदि आप कैमरे से २० फीट दूर खड़े à¤à¤• वà¥à¤¯à¤•à¥à¤¤à¤¿ की फोटो ले रहे हैं तो न सिरà¥à¤« वह वà¥à¤¯à¤•à¥à¤¤à¤¿ बलà¥à¤•à¤¿ उस वà¥à¤¯à¤•à¥à¤¤à¤¿ के अगल-बगल में खड़े हà¥à¤ अनà¥à¤¯ वà¥à¤¯à¤•à¥à¤¤à¤¿ à¤à¥€ फोकस की रेंज में आ जाते हैं। कैमरे के critical focus point से कितनी आगे और पीछे तक का à¤à¤°à¤¿à¤¯à¤¾ शारà¥à¤ª दिखाई देगा, यह तीन बातों पर निरà¥à¤à¤° करता है:
१)      कैमरा कितनी दूरी पर खड़े वà¥à¤¯à¤•à¥à¤¤à¤¿ / मौजूद वसà¥à¤¤à¥ को फोकस कर रहा है? कैमरे से subject की दूरी जितनी कम हो, उतना ही कम à¤à¤°à¤¿à¤¯à¤¾ शारà¥à¤ª फोकस में आयेगा।  यदि आप infinity पर फोकस कर रहे हैं तो पेड़ – पौधे, à¤à¤°à¤¨à¥‡, नदी, नाले, बरà¥à¤« से लदे पहाड़ आदि सब कà¥à¤› शारà¥à¤ª दिखाई देंगे। दूसरी ओर, यदि आप 3 ft. दूर खड़े अपने बचà¥à¤šà¥‡ को फोकस कर रहे हैं तो infinity पर मौजूद पेड़ – पौधे, पहाड़ आदि धà¥à¤‚धले दिखाई देंगे अरà¥à¤¥à¤¾à¤¤à¥â€ फोकस में नहीं आयेंगे।
२)    कैमरे की लेंस की ज़ूम कितनी फोकल लेंगà¥à¤¥ पर सैट की गई है? जितनी बड़ी फोकल लेंगà¥à¤¥ चयन की जायेगी, उतना ही कम à¤à¤°à¤¿à¤¯à¤¾ शारà¥à¤ª फोकस में होगा। मान लीजिये, आपने 200 mm. फ़ोकल लैंगà¥à¤¥ पर कैमरा सैट किया है तो कैमरे से दस फिट दूर खड़ी आपकी पतà¥à¤¨à¥€ तो शारà¥à¤ª फोकस में आयेगी किनà¥à¤¤à¥ 8 ft. या 12 फिट की दूरी पर मौजूद पेड़ – पौधे सà¥à¤ªà¤·à¥à¤Ÿ नहीं दिखाई देंगे अरà¥à¤¥à¤¾à¤¤à¥â€ फोकस में नहीं होंगे !
३)    कैमरे की लेंस का à¤à¤ªà¤°à¤šà¤° कà¥à¤¯à¤¾ सैट किया गया है? जितना बड़ा à¤à¤ªà¤°à¥à¤šà¤° होगा, उतना ही कम à¤à¤°à¤¿à¤¯à¤¾ शारà¥à¤ª फोकस में होगा ! 1.4 पर सब से कम कà¥à¤·à¥‡à¤¤à¥à¤° सà¥à¤¸à¥à¤ªà¤·à¥à¤Ÿ (in sharp focus) दिखाई देगा और 22 और 32 à¤à¤ªà¤°à¥à¤šà¤° पर अधिकतम कà¥à¤·à¥‡à¤¤à¥à¤° शारà¥à¤ª फोकस में दिखाई देगा।
इसका सीधा सा अरà¥à¤¥ ये हà¥à¤† कि अगर हमें केवल à¤à¤• निशà¥à¤šà¤¿à¤¤ दूरी पर मौजूद वसà¥à¤¤à¥ / वà¥à¤¯à¤•à¥à¤¤à¤¿ को फोकस में करना है और हम चाहते हैं कि उस वà¥à¤¯à¤•à¥à¤¤à¤¿ के पीछे और आगे मौजूद सब वà¥à¤¯à¤•à¥à¤¤à¤¿ / वसà¥à¤¤à¥à¤à¤‚ धà¥à¤‚धला जायें (out of focus) तो हमें à¤à¤ªà¤°à¥à¤šà¤° को यथासंà¤à¤µ खोल लेना चाहिये और लेंस को à¤à¥€ अधिकतम टेली मोड में रखना चाहिये। तीसरा काम यह करना होगा कि हमें जितना संà¤à¤µ हो, अपने सबà¥à¤œà¥‡à¤•à¥à¤Ÿ के निकट जाना चाहिये। à¤à¤¸à¤¾ करके हम अधिकतम shallow depth of field पà¥à¤°à¤¾à¤ªà¥à¤¤ कर सकेंगे। इस तकनीक को selective focusing à¤à¥€ कहते हैं।
यह आवशà¥à¤¯à¤• नहीं है कि आपके कैमरे की लेंस पर 1.4 से लेकर 32 तक à¤à¤ªà¤°à¥à¤šà¤° उपलबà¥à¤§ हों ! कà¥à¤› लेंस पर अधिकतम à¤à¤ªà¤°à¥à¤šà¤° 2.8 या 4 या 5.6 से आरंठहोता है और नà¥à¤¯à¥‚नतम à¤à¤ªà¤°à¥à¤šà¤° 8, 11 अथवा 16 तक जाता है। जैसे मेरा Sony HX 10 कैमरा है, इसमें नà¥à¤¯à¥‚नतम à¤à¤ªà¤°à¥à¤šà¤° 8 उपलबà¥à¤§ है और अधिकतम à¤à¤ªà¤°à¥à¤šà¤° à¤à¥€ 2.8 से ही आरंठहोता है। इसी पà¥à¤°à¤•à¤¾à¤° कैमरे में शटर सà¥à¤ªà¥€à¤¡ à¤à¥€ कहां से कहां तक उपलबà¥à¤§ होंगी, यह कैमरा मॉडल पर निरà¥à¤à¤° करता है। कà¥à¤› कैमरे 1/4000 सैकेंड से आरंठकरके 30 सैकेंड तक की शटर सà¥à¤ªà¥€à¤¡ की सà¥à¤µà¤¿à¤§à¤¾ देते हैं। वहीं कà¥à¤› कैमरे 1/1000 सैकेंड से आरंठकरके 1 सैकेंड तक की ही सà¥à¤µà¤¿à¤§à¤¾ पà¥à¤°à¤¦à¤¾à¤¨ करते हैं।
इस पोसà¥à¤Ÿ में हमने सिरà¥à¤« कैमरे की तकनीक को समà¤à¤¨à¥‡ की कोशिश की है। उमà¥à¤®à¥€à¤¦ करनी चाहिये कि इतना जान लेने के बाद हम पà¥à¤°à¤•à¤¾à¤¶ को समà¤à¤¨à¥‡ की दिशा में आगे बॠसकते हैं।  जहां तक पà¥à¤°à¤•à¤¾à¤¶ का संबंध है, हमें पà¥à¤°à¤•à¤¾à¤¶ को समà¤à¤¨à¥‡ के लिये बहà¥à¤¤ कà¥à¤› जानना आवशà¥à¤¯à¤• है कà¥à¤¯à¥‹à¤‚कि फोटोगà¥à¤°à¤¾à¤«à¥€ का अरà¥à¤¥ ही है – पà¥à¤°à¤•à¤¾à¤¶ का अंकन ! पà¥à¤°à¤•à¤¾à¤¶ की दो शà¥à¤°à¥‡à¤£à¤¿à¤¯à¤¾à¤‚ हैं – पà¥à¤°à¤¾à¤•à¥ƒà¤¤à¤¿à¤• सà¥à¤°à¥‹à¤¤ (सूरà¥à¤¯, चनà¥à¤¦à¥à¤°à¤®à¤¾ और अगà¥à¤¨à¤¿) और कृतà¥à¤°à¤¿à¤® सà¥à¤°à¥‹à¤¤ (बलà¥à¤¬, हैलोजेन, सोडियम वेपर, मरà¥à¤•à¤°à¥€ वेपर, सी.à¤à¤«.à¤à¤²., फà¥à¤²à¥‹à¤°à¥‹à¤¸à¥‡à¤‚ट टà¥à¤¯à¥‚ब, फà¥à¤²à¥ˆà¤¶ लाइट वगैरा वगैरा) । यही नहीं, पà¥à¤°à¤•à¤¾à¤¶ को समà¤à¤¨à¥‡ के लिये उसका रंग (color temperature – degree kelvin), दिशा (direction), सà¥à¤°à¥‹à¤¤ का आकार (size of the source of light), कोण (angle) समà¤à¤¨à¤¾ आवशà¥à¤¯à¤• है। पà¥à¤°à¤•à¤¾à¤¶ का à¤à¤• और महतà¥à¤µà¤ªà¥‚रà¥à¤£ सà¥à¤°à¥‹à¤¤ है – परावरà¥à¤¤à¤• (reflector) | आकाश, आस-पास के à¤à¤µà¤¨, रेत, पानी, वनसà¥à¤ªà¤¤à¤¿, दीवार आदि परावरà¥à¤¤à¤• reflector के रूप में पà¥à¤°à¤•à¤¾à¤¶ के बहà¥à¤¤ महतà¥à¤µà¤ªà¥‚रà¥à¤£ सà¥à¤°à¥‹à¤¤ हैं।  इनका ज़िकà¥à¤° अगले अंक में किया जा सकता है।
Creative / Pictorial effects of Aperture :
When we focus at some object at a certain distance, all other objects at the same distance (which are included in the viewfinder) also get sharply focused. However, the objects situated farther or nearer to the point of actual critical focus can be thrown out of focus through creative use of aperture. Not only aperture, but the focal length and subject to camera distance also play decisive role in deciding how shallow depth of field would be. Thus, we have got three methods which can be used exclusively or in combination to decide exact area that would be rendered sharply focused:
1)Â Larger the aperture, shallower would be the depth of field.
2)Â Longer the focal length, shallower would be the depth of field.
3)Â Nearer the subject, shallower would be the depth of field.
Thus, if we want to focus on a single object and want everything else to remain unobtrusive and out of focus, we should choose highest possible tele setting on our camera, should open up the aperture as far as possible and should also move closer to our subject of interest as much as possible. These three factors would control the depth of field (area appearing to be in focus before and beyond the point of critical focus is known as depth of field).

A tripod is a must to avoid any blur in this kind of photography.
Not all lenses offer aperture values from 1.4 to 32 to us. We find that a particular lens starts at f=2.8 and ends at f=8 while other starts at 5.6 and ends at 22. Similarly, shutter speeds offered by a camera also differ from model to model and make to make. While a camera may start at 1/1000 sec. and end at 1 second, some other camera may start at 1/4000 or 1/8000 and may end up at 30 seconds at the other extreme.

Modern digital cameras cope with unexpected colours of stage lights very well.

Waiting for the Sunrise !
Having learnt the basics of the camera, we may now move on to understand the LIGHT. Photography literally means – recording of light. There are primarily two sources of light – natural and artificial. Sunlight, moon light and fire are natural sources of light whereas bulbs, halogen, mercury vapour, sodium vapour lamps, fluorescent tubes, CFL tubes, LED lights, flash light etc., fall under artificial sources of light. Each of these has its own characterstics. In order to understand the light, we need to understand its colour temperature (measured in degree kelvin), direction, intensity, size of source and angle. Quite interestingly, reflectors are also great source of light for a photographer. Sky is the biggest reflector of light known to us but water, sand, building walls, vegetation also serve as reflectors and we need to consider their effect on our photographs. We can continue to study about them in next post.